WordPress Tip: WordPress Image Galleries — Give Your Photo Galleries a Lightbox/Slideshowesque Display
Jan 2009 Update: Please see the note at the bottom of this page. Because I had trouble using captions with the Photojar plugin, I deactivated the plugin.
A WordPress image gallery allows you to create a sharp-looking presentation for your photos or images. With just a couple of plugins and tweaks and some basic understanding of the WordPress gallery tag, you can make a Lightbox/Slideshowesque display of your gallery images without any custom coding.
Here's an example of a WordPress gallery that goes a step beyond the default. Click each of the images, and then click the arrow buttons on the image to move to the next one. Instructions for creating such a gallery are below.
[gallery]
To create a WordPress image gallery like the one above:
- Download and install the PhotoJAR plugin and the Lightbox plugin. Unzip and upload to your plugins folder, and then activate as usual.
- After activating the plugins, click the Settings tab (far right), and then click PhotoJAR. In the Link Images To drop-down, select Lightbox/Slimbox. In the Gallery Image Size filter, select Thumbnail. Then click Update Options at the bottom.
- Click the Lightbox2 tab, choose the lightbox theme color you want, and then click Save Changes.
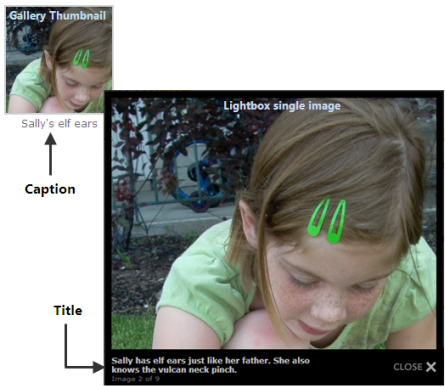
- Create a new post and upload your collection of images by clicking the Add an Image button. When you upload an image, it is associated with the post. With each image, add text in the Title and Caption fields. The caption will appear below the gallery thumbnail (so make it short), whereas the Title will appear below the image when viewed alone (so make it longer).

- After uploading the images, close the dialog box. Do NOT click the Insert into Post button. Your images are already associated with the post. When you add a gallery tag, they will automatically be pulled into the post without any html code at all.
- In the HTML view, add the following code to your post: [gallery size="125x125xcrop"]
. 125 x 125 is the thumbnail size, which you can change to best fit your blog's width. By default, three images appear in a row.
- Modify the styles for the captions and image sequence numbers by modifying your Lightbox theme's style sheet at /wp-content/plugins/lightbox-2/Themes/Black/. In the following style declarations, caption controls the Title; numberDisplay controls the "Image 1 of 7..." text. Change the values as desired.
- Publish your post.
#stimuli_imageData #stimuli_caption{ font-weight: bold; background-color: black; font-size: 12px; color: #c0c0c0;}
#stimuli_imageData #stimuli_numberDisplay{ background-color: #000000; display: block; clear: left; padding-bottom: .5em;}
Rearranging the Gallery Image Order
With WordPress 2.6, you can arrange the gallery image order by dragging the images on the Gallery tab into the order you want.
Additional Reading
- The PhotoJAR plugin has a lot more power and control, with different tags and parameters. You can read more about it here.
- For more details about the Lightbox plugin, see the Lightbox pugin's page here.
- To better understand the WordPress gallery and image tags (new with WordPress 2.5), see the Codex page on gallery shortcodes.
- If you need a more robust image gallery plugin, see the NextGen Gallery plugin.
Note About Image IDs
If you don't want to insert an entire gallery, you can insert individual images (which are associated with any post), but you have to know the image IDs. To view the image IDs, go to the Manage tab and click the Media Library subtab. Mouse over the image title and look at the Post ID that appears in your browser's footer. You can then insert the single image into your post by using the following code: [image=23]. Also, replace 23 with your real image ID.
You can also click the Insert into Post button that appears below the image when viewing the Gallery tab.
Note About the Description Field
You'll notice I didn't mention the Description field. The Description field doesn't apply to images with the Lightbox effect. If you weren't using the Lightbox effect for the gallery, each individual image -- when clicked -- would appear on its own page, with the Description text below it. The Lightbox plugin makes the image appear in a layer on the current page.
Photo Credit Goes to Jane
Special thanks to Jane for the photos (yes, they're our kids). The post where she wrote about this event is here: Sugar and Sugar, and Everything Nice.
Nov 5, 2008 Update
I had trouble getting WordPress's new caption feature to work with Photojar, so I actually went back and undid all the posts with images since implementing Photojar. Photojar writes the image tag differently than WordPress 2.6 when you insert a caption. I love having captions, so I deactivated Photojar. Sorry. However, depending on your needs, this plugin may be right for you.


