Content Re-use is so much better with DITA (and esp. with OxygenXML)
After my last post on content re-use strategies with Confluence, I realized that while you can do re-use with Confluence, you have to rely on so many third-party plugins, the whole solution tends to feel cobbled together with string and glue. While I initially thought Confluence would simplify authoring and allow me to focus more on content, the primitive re-use capabilities actually make help authoring more tedious and time consuming.
The real deal-killer with Confluence is managing access control. The paradigm is that all content is on one site, grouped into different spaces. If you only want certain groups to see certain content, you have to individually manage their access to those spaces (and each logged-in user counts against your licensing costs). That's a lot of individual user management. If you make the site anonymous and create several sites (one for each product), you can't reuse the same content easily across the different sites.
Because of these issues, I've ditched Confluence and am hoping to officially adopt an XML solution using OxygenXML as the editor. I'm still working on the proof of concept, but it looks promising. XML allows you to re-use content in easier ways. Content re-use with DITA is much more robust, precise, and just works.
In this post, I explain how to do content re-use with DITA and Oxygen.
The scenario for content re-use
I described the scenario for content re-use in my previous post. I'll repeat the scenario here because the content re-use strategies I'm using are formulated based on this situation.
Suppose you're creating an online manual for a Trek 7.1 FX, 7.2 FX, and 7.3 FX model bike. Additionally, the same parts you're documenting are also pushed into another brand: Gary Fisher. The parts are mostly the same for the Gary Fisher and Trek bikes, except the parts for the Fisher bikes are rebranded with the Gary Fisher brand. There are three Gary Fisher bike models: City Slicker 2.0, City Slicker 2.1, and City Slicker 2.2. So in total, you have six manuals to produce from roughly the same content.
There are approximately 30 sections in your manual, with topics such as maintaining brakes, adjusting handlebars, tightening bottom brackets, greasing chains, adjusting spokes, and so on.
There are some variations between the topics, sometimes as trivial as simple name changes, other times more substantial, such as entirely different processes.
For example, while the Trek and Fisher bikes both have Shimano brakes and derailleurs, the Fisher bikes have different cranks and pedals than the Trek cranks and pedals. Both have the same tires and wheels, but the Fisher has a different spoke size. Both have similar seat stems, but the Trek is fastened via a bolt while the Fisher is fastened with quick release, and so on. There is 70% similarity of content between the six manuals. You'll need to make content adjustments for the differing brands and models.
When re-using content, there are several techniques to consider:
- Re-use of topics
- Re-use of paragraphs
- Variables
- Conditional processing
Re-using topics
Your DITA map consists of a list of references to topics. If you want to use the same topic in different DITA maps, you just reference that topic again in another map.
Map for Trek
<topicref href="maintaining_brakes.dita"/><br />
Map for Gary Fisher
<topicref href="maintaining_brakes.dita"/><br />
But you may not want to create separate maps, because more maps means more maintenance and updates. Instead, you can create various conditions and apply the conditions to the topics in the same map. This is where DITA gets really powerful. To understand how to do this, I need to explain conditional profiling.
DITA offers a set of standard attributes that you can apply to most elements. The general attributes are as follows:
audienceplatformproductpropsotherprops
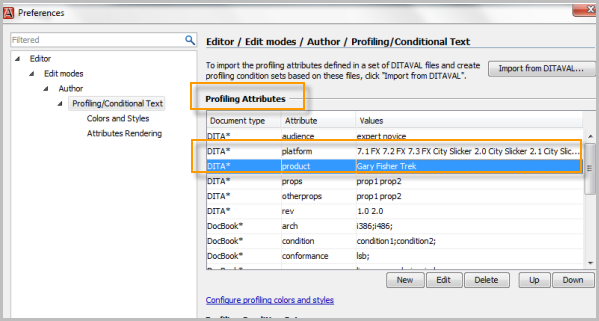
You set the values you want for each attribute. In this scenario, I'll use product and platform attributes. You can't change the names of the attributes (because they're part of the DITA schema), but you can edit their values. (The props and otherprops are meant to be generic to adapt to any situation.)
Here are my product attribute values:
trekgary_fisher
And my platform attribute values:
71_fx72_fx73_fxcity_slicker_21city_slicker_22city_slicker_23
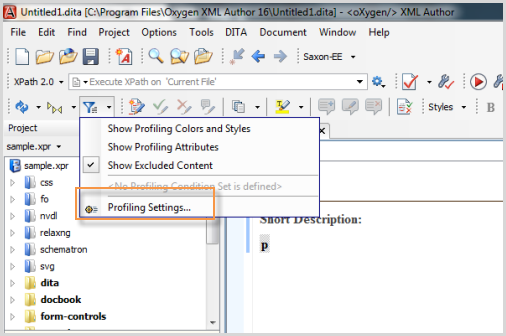
To set up your attributes and values in OxygenXML, enter the Author view and click the Profiling Attributes button ![]() . Then select Profiling Settings.
. Then select Profiling Settings.

Alternatively, go to DITA > Profiling/Conditional Text > Edit Profiling Attributes.
In the Profiling Attributes section, edit the values for each of the attributes.

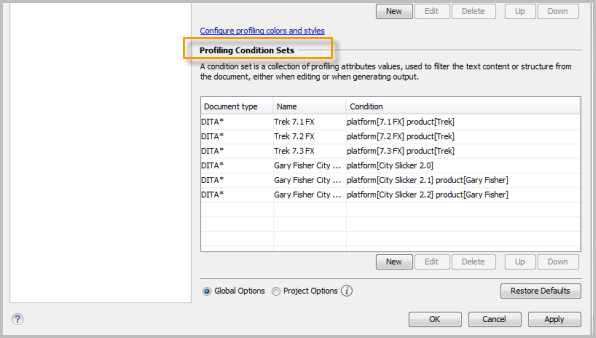
While you're on the same screen, move to the next section below: Profiling Condition Sets. Here you can define the combinations of the profiling attributes you want for your various targets. In this case, I want the following condition sets:
- Trek 7.1 FX manual => Product:
trek, Platform:71_fx - Trek 7.2 FX manual => Product:
trek, Platform:72_fx - Trek 7.3 FX manual => Product:
trek, Platform:73_fx - Gary Fisher City Slicker 2.0 manual => Product:
gary_fisher, Platform:city_slicker_20 - Gary Fisher City Slicker 2.1 manual => Product:
gary_fisher, Platform:city_slicker_21 - Gary Fisher City Slicker 2.2 manual => Product:
gary_fisher, Platform:city_slicker_22

Now you can start using these attributes almost any DITA element. Suppose you want to apply an attribute to your map so that you can use the same map for each product. You might apply the attributes like this:
<topicref href="maintaining_brakes_71_fx.html" product="trek" platform="71_fx"/><br />
<topicref href="maintaining_brakes_72_fx.html" product="trek" platform="72_fx"/><br />
<topicref href="maintaining_brakes_73_fx.html" product="trek" platform="73_fx"/><br />
<topicref href="maintaining_brakes_cs_20.html" product="gary_fisher" platform="city_slicker_20/><br />
<topicref href="maintaining_brakes_cs_21.html" product="gary_fisher" platform="city_slicker_21"/><br />
<topicref href="maintaining_brakes_cs_22.html" product="gary_fisher" platform="city_slicker_22"/><br />
Now configure your transformation scenarios with the right condition sets:
- Click the Transform Scenarios button
 .
. - Select New.
- Select DITA OT Transformation.
- Select Webhelp and click OK.
- Name the transformation scenario (for example, Trek 7.3 FX).
- Click the Filters tab.
- Select the profiling condition set you configured. Then click OK. (You may need to toggle the radio button to another selection and then come back to select Use profiling condition set -- not sure if that's a UI quirk.)
- Select the transform scenario you just created and click Apply Associated. For example, if you selected the Trek 7.3 FX transform scenario, only the
In this example, I've applied the conditions at the topic level. But this assumes that the topics are substantially different. Most likely you would apply the conditions to elements within the same topic. For example, your topic might look like this:
<p product="trek">You can adjust your brakes by loosening the bolt with a 5mm allen wrench and sliding the brake pads to the distance you want. Then tighten the bolt.</p></p>
<p><p product="gary_fisher">You can adjust your brakes by loosening the bolt with a 7mm allen wrench and sliding the brake pads to the distance you want. Then tighten the bolt. Alternatively, rotate the quick turn nut on the end of the brake cable next to your brake handles to make adjustments on the fly.</p><br />
Tip: If you want to be even more granular, you can surround a word with ph tags (for phrase). The tags can be applied to any element, so if the element you want doesn't allow you to apply these general attributes (such as the entry element in a table), you can just put ph tags inside the element.
Here's an example:
Your bike is equipped with Shimano <ph platform="71_fx">Ultegra components</ph><ph platform="72_fx 73_fx">105 components</a>.<br />
In this example, the conditional processing will apply the processing at a more granular level. For transform scenarios that include both 72_fx and 73_fx, the sentence will read:
Your bike is equipped with Shimano 105 components.<br />
(When adding multiple values to an attribute, just separate the values with a space.)
Re-using paragraphs
Let's suppose you want to re-use the same paragraph across different guides. For this kind of re-use, you incorporate something called a conref. Create a new file called something like "notes.dita". Unless you need specific tags only available in a specialized type (like an entire section or a task list), use a generic topic type.
Here's a sample note that I want to re-use.
<note type="note" id="bolt_warning">Don't overtighten the bolts, since you could strip the threads and make it impossible to loosen.</note><br />
In your topic, you apply a conref attribute element to the same type of element and reference your note, like this:
<note conref="notes.dita#bolt_warning"/><br />
The content will be inserted there when you transform it.
Variables
Finally, let's say you have a variable that you want to use on a page. For bikes shipped to the UK, they use a different derailleur version. U.S. versions have "MTB" derailleurs, but UK versions use "DR" components. To implement variables in DITA, you use keyword references.
Your bike is equipped with <keyword keyref="derailleur_version"/> derailleurs.<br />
In a map file, add this:
 <keydef keys="derailleur_version"><br />
 <topicmeta><br />
 <keywords><br />
 <keyword>MTB</keyword><br />
 </keywords><br />
 </topicmeta><br />
 </keydef><br />
You could manually change the keyword value from MTB when you want to push out a different value there, such as DR.
But you could also apply conditional attributes to the keyword element so that the value changes dynamically.
 <keydef keys="derailleur_version"><br />
 <topicmeta><br />
 <keywords><br />
 <keyword audience="uk">DR</keyword><br />
 <keyword audience="us">MTB</keyword><br />
 </keywords><br />
 </topicmeta><br />
 </keydef><br />
You could also use this method when writing generalized sentences like this that refer to the brand:
Congratulations on the purchase of your new <keyword keyref="bike_model"/> bike.<br />
Your map would include this code:
 <keydef keys="bike_model"><br />
 <topicmeta><br />
 <keywords><br />
 <keyword product="trek">Trek</keyword><br />
 <keyword product="gary_fisher">Gary Fisher</keyword><br />
 </keywords><br />
 </topicmeta><br />
 </keydef><br />
Most people will create a map file that contains all their keyword definitions, and then link to the keyref map file from their regular map, adding an attribute of processing-role="resource-only" to the topicref so it doesn't appear in the TOC.
Ease of editing
When you have sophisticated re-use needs, there's no better platform than DITA XML and applying the conditional profiling. It allows you to apply the conditions at an extremely granular level, giving you a robust solution to accomplish nearly any type of re-use.
What's great about OxygenXML is that the editor makes it really easy to apply the conditions. Without Oxygen, you would need create a DITAVAL file that explains what should be excluded:
<val><br />
 <prop action="exclude" att="platform" val="gary_fisher" /><br />
 <prop action="exclude" att="product" val="city_slicker_20" /><br />
 <prop action="exclude" att="product" val="city_slicker_21" /><br />
</val><br />
In the DITAVAL file method, you identify the attribute and value and then apply an exclude action. (You don't apply an include, just exclude.) You can still use DITAVAL files with Oxygen if you want.
With Oxygen, however, the conditional profiling works more intuitively (similar to Flare, actually). In Oxygen, when you create a condition set that includes certain values, other values not selected from that same attribute are excluded. If you don't apply any attribute to content, everything is included.
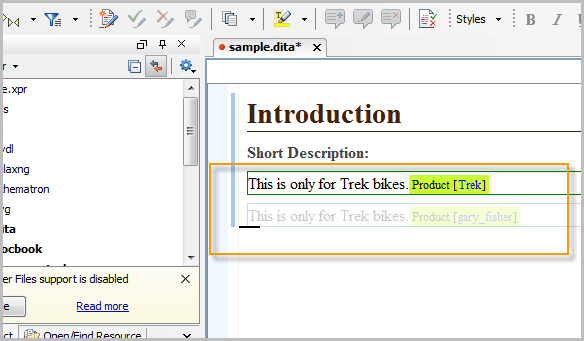
Also, when you're in the Author mode, you can switch to the condition set that you want to see. If you switch to Trek 7.3 FX, only the content that meets that condition set appears in the Author view.
You can also set it so that the content not included is semi-transparent. This mode makes it easy to edit content that has a myriad of complex conditional profiling. Here's an example. The content with the attribute for gary_fisher is transparent because I've selected to only see the trek content.

I've been using attributes like this for the past week using OxygenXML and can't believe I was trying to hack the same solution in Confluence. It's like moving from the stone age to the modern age.
Related links
See the Conditional Profiling link in my DITA QRG.


