Creating context-sensitive help by converting your help into a JSON API with Jekyll
I've written a lot about documenting APIs, but what if your documentation itself could function as an API? By this I mean, what if you could give developers an endpoint through which they could retrieve different parts of your documentation? This setup would work well for context-sensitive help within an application.
I stumbled across a cool Jekyll plugin called Jekyll Pages API that actually allows you to do this. The plugin creates a JSON file containing your site's pages and posts. From this JSON file, developers can make calls for specific data.
Here's an example. I uploaded a vanilla Jekyll site here: docasapi.
The site has 2 pages. I will get the content from those pages using the following endpoint:
https://s3.us-west-1.wasabisys.com/idbwmedia.com/files/apidemos/docasapi/api/v1/pages.json.
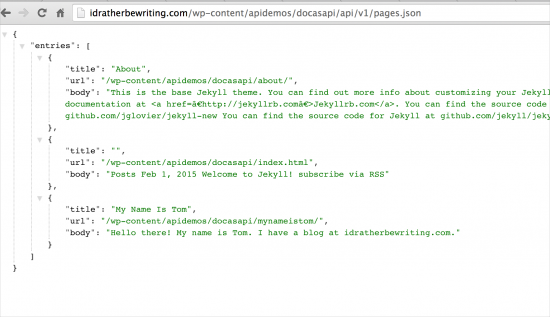
You can see the page content formatted as a JSON file by going to the endpoint:
(BTW, it helps to add the Chrome JSON formatter extension to format the JSON in your browser.)
The Jekyll Pages API creates a pages.json file when you build your site.
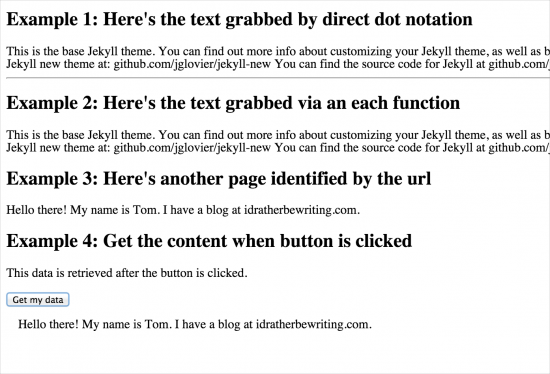
Here's a sample page showing how one might call the endpoint to retrieve and append the information on a page: Sample Doc API Call.
Just view the source code on that page for the details. There are four examples. I've copied the code here for convenience:
<!DOCTYPE html>
<html>
  <head>
    <style>
      #applesGoHere {
        margin:15px;
      }
    </style>
    <title>Sample API calls to doc</title>
  </head>
  <!-- you need jquery for the each and append methods -->
  <script src="http://ajax.googleapis.com/ajax/libs/jquery/1.11.1/jquery.min.js"></script>
  <!-- script for example 1-->
  <script>
    var url = "https://s3.us-west-1.wasabisys.com/idbwmedia.com/files/apidemos/docasapi/api/v1/pages.json";
    $.getJSON(url, function(data) {
      console.log(data);
      $("#directNotation").append(data.entries[0].body);
    });
  </script>
  <!-- script for example 2 -->
  <script>
    var url = "https://s3.us-west-1.wasabisys.com/idbwmedia.com/files/apidemos/docasapi/api/v1/pages.json";
    $.getJSON(url, function(data) {
      console.log(data);
      $.each(data.entries, function(i, page) {
        if (page.title == "About") {
          $("#eachLoop").append(page.body);
        }
      });
    });
  </script>
  <!-- script for example 3 -->
  <script>
    var url = "https://s3.us-west-1.wasabisys.com/idbwmedia.com/files/apidemos/docasapi/api/v1/pages.json";
    $.getJSON(url, function(data) {
      console.log(data);
      $.each(data.entries, function(i, page) {
        if (page.url == "/wp-content/apidemos/docasapi/mynameistom/") {
          $("#tomsmyname").append(page.body);
        }
      });
    });
  </script>
  <!-- script for example 4 -->
  <script>
    $(document).ready(function() {
      $( "#apples" ).click(function() {
        var url = "https://s3.us-west-1.wasabisys.com/idbwmedia.com/files/apidemos/docasapi/api/v1/pages.json";
        $.getJSON(url, function(data) {
          console.log(data);
          $.each(data.entries, function(i, page) {
            if (page.url == "/wp-content/apidemos/docasapi/mynameistom/") {
              $("#applesGoHere").append(page.body);
            }
          });
        });
      });
    });
  </script>
  <h2>Example 1: Here's the text grabbed by direct dot notation</h2>
  <div id="directNotation"></div>
  <hr/>
  <h2>Example 2: Here's the text grabbed via an each function</h2>
  <div id="eachLoop"></div>
  <h2>Example 3: Here's another page identified by the url</h2>
  <div id="tomsmyname"></div>
  <h2>Example 4: Get the content when button is clicked</h2>
  This data is retrieved after the button is clicked.
  <button id="apples">Get my data</button>
  <div id="applesGoHere"></div>
  </body>
</html>
Tip: When you check out the sample calls, open your JavaScript Console (in Chrome, go to View > Developer > JavaScript Console) to view the payload logged to the console. (I added some console log messages in the scripts to make the payload more inspectable.)
I won't go into much detail about the code except to point out that I demonstrated 4 ways to get the data. Example 1 uses direct dot notation: data.entries[0].body. This is simply how you access the JSON you want. However, since the order of the objects might change, this approach would be hard to manage.
The second example uses jQuery's each method to iterate through the JSON data looking for a page titled "About". However, this method is a little shaky too since page titles frequently change.
The third example uses jQuery's each method again to iterate through the JSON data, but this time it looks for a specific url. I think this is the most stable approach.
Finally, developers aren't going to be coding all of this logic in their applications. Most likely the functions will be triggered from click or hover events. That's what the last sample shows.
All you need to do is tell the developer to add unique IDs to each element where you want the context-sensitive help to appear. Then deliver a JavaScript file with a bunch of functions as shown in example 4. The developer would then add this JavaScript file to the same server as the website. And voila -- you have context-sensitive help the modern way.
Note: If your JavaScript file is called from a different server than your website, you may get cross-original resource sharing warnings.
How to replicate the Jekyll site with the JSON API plugin
You don't have to know much about Jekyll to get this sample site running. Here are some simple steps to implement it all. You can also download the project here: apirubytest.
These instructions assume you're on a Mac. (Sorry PC people -- I will update this one day. The instructions may be highly similar anyway.)
- Make sure you have Ruby. Open Terminal and type
which ruby. You should see the version and location listed. If you don't have Ruby, install XCode (it contains a lot of dependencies.) - Install RubyGems, which is Ruby package manager. (To see if you already have RubyGems, type
gem --version.) - Install Bundler:
gem install bundler. - Install Jekyll:
gem install jekyll. - Create a new Jekyll site:
jekyll new testsite. - Change to your new site's directory:
cd testsite. - Use Bundler to create a new Gemfile to contain your project's plugins/gems:
bundle init - Open the Gemfile:
open Gemfile - Add the following [Jekyll-Pages-API gem] in the Gemfile:
group :jekyll_plugins do

  gem 'jekyll_pages_api'

end
- Save (CMD+S) and then close (CMD+W) the text editor.
- Instruct Bundler to get the required gems based on your Gemfile:
bundle install. - Execute the scripts in your Gemfile and build your Jekyll project:
bundle exec jekyll serve.
You should see an address for a server at http://127.0.0.1:4000. Preview your Jekyll site there.
Add /api/v1/pages.json after your server path, and you should see the JSON from your pages.
Jekyll builds the site output inside the _site folder. You will find an api folder in the _site output that contains the JSON data.
Note that links don't quite carry over in the JSON unless you swap in character symbols (such as < for the angle brackets (<).


